Studio Site Customization
Once you have access to your Studio Site, follow the instructions below to customize the site. You will receive a website shell with placeholders for page names, page text, and images. To customize the Studio Site, you may want to consider:
- Changing the Studio Site name
- Renaming individual pages
- Adding new pages
- Custom title tag and SEO key phrases and adding page meta descriptions
- Deleting pages that you do not need
- Updating placeholder text and images with your content
- Updating the navigation menu and site footer
After you have customized your site, learn how to publish your Studio Site.
Change website name
To change the name of your Studio Site website, follow the instructions below.
- In the site tree, navigate to the Site Configuration folder.
- Select the Metadata content type.
- Update the name in the Website Name field.
- Press the Save changes button.
- In the Site Configuration folder, select the Header content type that matches the name of your website home page (The content type from the template is labeled "Header - Website Name").
- Update the site name in the Website Name field.
- Press the Save changes button.
Rename page(s)
When you rename a page, you must change the page name in two separate locations in TerminalFour(T4). This will ensure that the page name updates on the page itself, as well as in the navigation in both the top menu and the left sidebar menu. Follow the steps below to rename a Studio Site web page.
Change the page name in the T4 Site Structure
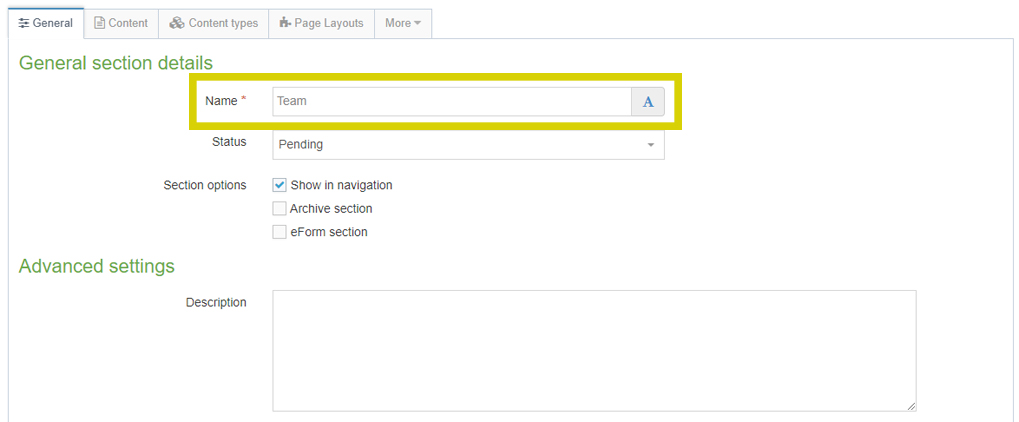
- From the T4 Site Structure, select the name of the page you want to update.
- Navigate to the General tab.
- Update the text in the Name field to the new page name.
- Press the Save Changes button at the bottom of the screen.
Important: The page name you set following this process will directly impact the URL of the page once published. Ensure the page name listed here is what you'd like to be reflected in your URL and be careful not to include extra characters like hyphens or dashes.
Change the page name in top and left sidebar menus
- After changing the page name in the site structure, navigate to the Site Configuration folder.
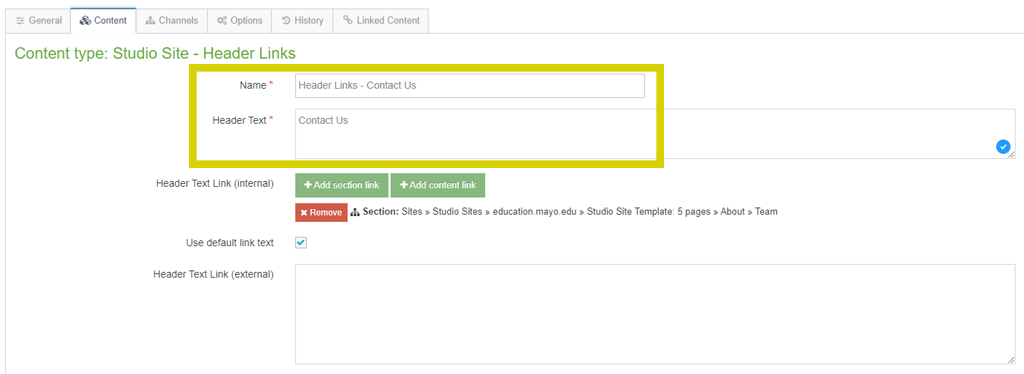
- Click on the content type labeled Header Links that matches the former name of the page you are updating (ie, If you are changing the page titled "About" to be named "Contact us," you would now select on the content type labeled "Header Links - About").
- Update the page name to the new page name in the Name and Header Text fields.
- Ensure the Header Text Link field is linked to the correct page.
- Press the Save changes button.
Add new page(s)
Use these steps to create a new page.
- From the T4 Site Tree, click on the name of your website to open the folder of the main page.
- From the top menu bar, select the More dropdown menu.
- Select Child sections.
- Press the Add section button.
- In the Name field, enter the name of the new page.
- Using the status dropdown menu, change the status from "Approved" to "Pending."
- Select the appropriate page layout settings for your desired page layout and click the Save changes button.
- To add the new page to the top or sidebar navigation, use a header link content type in the Site Configuration folder.
Page layout settings
When creating a new page in T4, you must select the appropriate advanced settings for your desired page layout. Most Studio Sites utilize the full-width page layout.
Full-width page
- From the General tab, select the following settings:
- Heading level: 2
- Then, navigate to the Page Layouts tab.
- From the page layout dropdown menu, select Studio Site Full Width.
- Press the blue Save changes button.
Inner page with left sidebar
- From the General tab, select the following settings:
- Heading level: 3
- Studio Site Left Nav Menu: Display level 3 till Level 5 links
- Then, navigate to the Page Layouts tab.
- From the page layout dropdown menu, select Studio Site - Inner Left Navigation.
- Press the blue Save changes button.
Inner subpage with left sidebar
This option is for second-level subpages.
- From the General tab, select the following settings:
- Heading level: 4
- Studio Site Left Nav Menu: Display level 3 till Level 5 links
- Then, navigate to the Page Layouts tab.
- From the page layout dropdown menu, select Studio Site - Inner Left Navigation.
- Press the blue Save changes button.
Inner page with right sidebar
- From the General tab, set the Heading level to 3.
- Then, navigate to the Page Layouts tab.
- From the page layout dropdown menu, select Studio Site - Right Sidebar.
- Press the blue Save changes button.
News page with right sidebar
- From the General tab, set the Heading level to 4.
- Then, navigate to the Page Layouts tab.
- From the page layout dropdown menu, select Studio Site - Right Sidebar.
- Press the blue Save changes button.
Optimizing your website for search engines
Search Engine Optimization (SEO) helps your website rank higher on search engines like Google, making it easier for people to find your content. A crucial part of SEO is optimizing your title tags and SEO key phrases for each page.
A title tag is clickable text that appears in search results. It gives users and search engines a quick overview of your page and is one of the most important on-page SEO elements.
To enter or update a custom title tag in T4:
- Navigate to the page you're updating in the T4 Site Structure.
- From the top menu bar, select General.
- Add a one-sentence summary of the page’s content to the custom title tag field.
Example: "Mayo Clinic | Physician Training"
Tip: Keep the title tag under 60 characters to display fully in search results.
To enter or update SEO key phrases in T4:
- Navigate to the page you're updating in the T4 Site Structure.
- From the top menu bar, select General.
- Add 2-4 keywords or short phrases that describe your page’s content in the SEO key phrases field.
Example: "Mayo Clinic, continuing medical education, physician training, medical conferences"
Tip: Use keywords people are searching for and keep it relevant to the page.
Metadata descriptions
It is a best practice to add a metadata description to each page. A metadata description is a concise summary of a page's content.
- Search engines look for this information and may include it when displaying search results.
- Metadata descriptions can also enhance the accessibility of a website for users who use screen readers. Screen readers read the metadata aloud to help users understand what that page is about.
To enter or update a metadata description in T4:
- Navigate to the page you're updating in the T4 Site Structure.
- From the top menu bar, select More.
- From the dropdown menu, select Metadata.
- Add a metadata description of 140-160 characters into the description field.
Example: "Learn how to customize your Studio Site, including how to change the website name, add or delete pages, and make updates to the navigation menus."
Tip: Use a character count tool to ensure you are writing a metadata description between 140-160 characters.
Add new page to the top navigation menu
- Navigate to the Site Configuration folder in the T4 Site Structure.
- Press Add content.
- Select the Studio Site - Header Links content type.
- Add the following elements:
- Name: Add "Header Links - [name of your new page]"
- Header Text: Add name of your new page
- Header Text link (internal): Select "Add section link" and select the new page.
Add a sub page dropdown menu to the top navigation bar
- Navigate to the Site Configuration folder in the T4 Site Structure.
- In the Site Configuration folder, select the Header Links content type of the main / parent page.
- Under the Header Dropdown Links field, press the bulleted list button.
- Press the link button.
- Click Insert Section Link.
- Click on the page(s) you want to add to the dropdown menu of subpages.
- Press the Save changes button.
Delete page
Follow these steps to remove a page from your website.
- Navigate to the page you'd like to remove on the live website and record the current URL (education.mayo.edu/studiositename/pagetoremove)
- From the site tree, navigate to the page you'd like to remove.
- In the General tab, use the dropdown menu to change the status to inactive.
- Press the Save changes button.
Follow these steps to permanently delete a page from your website.
- Navigate to the page you'd like to remove on the live website and record the current URL (education.mayo.edu/studiositename/pagetoremove)
- From the site tree, navigate to the page you'd like to remove.
- In the General tab, write the word DELETE in the Name field next to the page name.
- Use the dropdown menu to change the status to inactive.
- Press the Save changes button.
- Within a few weeks, the page will be permanently deleted. This action cannot be reversed.
Next, you must remove the page in top and left sidebar menus.
- After setting the page to inactive in the site structure, navigate to the Site Configuration folder.
- Press the Action button on the content type labeled Header Links that matches the former name of the page you are removing (i.e., "Header Links - About").
- Select Delete from the dropdown menu.
- Press the Save changes button.
Update the Site Footer
- In the site tree, go to the Site Configuration folder.
- Press the Footer content type.
- Replace the following:
- Studio Site name
- Social media links (if applicable)
- Address
- Enter a description in the Last Column Text field
- Press the Save changes button.
Update placeholder content
As you customize your site, you will need to add, delete, or replace the placeholder text and images included on the website template. Review the Managing Content section to learn more about this process.